January 5, 2017

Thursday - Shoulders Day!

Thursday - Shoulders Day incline-dumbbell-press-_dumbell_workout_chest.jpg


  1. Incline Dumbbell Press Guide:
    1. Lie back on an incline bench with a dumbbell in each hand atop your thighs.
    2. Then, using your thighs to help push the dumbbells up, lift the dumbbells one at a time so that you can hold them at shoulder width.

images.jpg
Car Drivers:
  1. While standing upright, hold a barbell plate in both hands at the 3 and 9 o'clock positions. Your palms should be facing each other and your arms should be extended straight out in front of you. This will be your starting position.
  2. Initiate the movement by rotating the plate as far to one side as possible. Use the same type of movement you would use to turn a steering wheel to one side.
  3. Reverse the motion, turning it all the way to the opposite side.
  4. Repeat for the recommended amount of repetitions.

733c7b0a9718331bdbc780b29df9b83b.jpg
Incline Rear Delt Flys:
  1. To begin, lie down on an incline bench with the chest and stomach pressing against the incline. Have the dumbbells in each hand with the palms facing each other (neutral grip).
  2. Extend the arms in front of you so that they are perpendicular to the angle of the bench. The legs should be stationary while applying pressure with the ball of your toes. This is the starting position.
  3. Maintaining the slight bend of the elbows, move the weights out and away from each other (to the side) in an arc motion while exhaling. Tip:Try to squeeze your shoulder blades together to get the best results from this exercise.
  4. The arms should be elevated until they are parallel to the floor.
  5. Feel the contraction and slowly lower the weights back down to the starting position while inhaling.
  6. Repeat for the recommended amount of repetitions.

Arnold-Press-2.jpg
Arnold Press:
  1. Sit on an exercise bench with back support and hold two dumbbells in front of you at about upper chest level with your palms facing your body and your elbows bent. Tip: Your arms should be next to your torso. The starting position should look like the contracted portion of a dumbbell curl.
  2. Now to perform the movement, raise the dumbbells as you rotate the palms of your hands until they are facing forward.
  3. Continue lifting the dumbbells until your arms are extended above you in straight arm position. Breathe out as you perform this portion of the movement.
  4. After a second pause at the top, begin to lower the dumbbells to the original position by rotating the palms of your hands towards you. Tip:The left arm will be rotated in a counterclockwise manner while the right one will be rotated clockwise. Breathe in as you perform this portion of the movement.
  5. Repeat for the recommended amount of repetitions

Dumbbell_Alternating_Shoulder_Press_with_Twist.jpg
Alternating Dumbbell Shoulder Press:
  1. Stand with a dumbbell in each hand. Raise the dumbbells to your shoulders with your palms facing forward and your elbows pointed out. This will be your starting position.
  2. Extend one arm to press the dumbbell straight up, keeping your off hand in place. Do not lean or jerk the weight during the movement.
  3. After a brief pause, return the weight to the starting position.
  4. Repeat for the opposite side, continuing to alternate between arms.

lower_body-1.jpg
Standing Dumbbell Lateral Raise:
  1. Pick a couple of dumbbells and stand with a straight torso and the dumbbells by your side at arms length with the palms of the hand facing you. This will be your starting position.
  2. While maintaining the torso in a stationary position (no swinging), lift the dumbbells to your side with a slight bend on the elbow and the hands slightly tilted forward as if pouring water in a glass. Continue to go up until you arms are parallel to the floor. Exhale as you execute this movement and pause for a second at the top.
  3. Lower the dumbbells back down slowly to the starting position as you inhale.
  4. Repeat for the recommended amount of repetitions.

January 4, 2017

Wednesday - Back Day!

Aside from Leg Day, back is for sure one of my favorite workout days! assisted_pull_up1.jpg
Assisted Pull ups:
  1. Securely set the pin on the desired weight.
  2. Stand on the side platforms, and hold onto the outer handles. Lift one knee, and place it on the padded knee rest. Tightly hold onto the handles as you place your second knee onto the knee rest and be prepared to hold yourself up (with the assistance of the counterweight). Keep your abs engaged, spine neutral, and shoulders pressed down and back.
  3. Pull yourself up as far as possible, making sure to keep your abs engaged and your shoulders pressed down and back. Slowly release down until your arms are almost straight.
  4. Repeat 10-15 times. When getting off of the machine, be sure to pull yourself all the way to the top first. Keeping your arms engaged, slowly lift one knee and lower it to the side platform, then the other.single-arm-cable-row.jpg
One Arm Cable Row:
  1. Set up for the standing one arm cable row by attaching a single handle to the low pulley cable. Adjust the stack to the desired weight.
  2. Position yourself around 3 feet from the cable machine and grasp the handle with your right hand.
  3. Take the weight off the stack and bend at the knees slightly. Put your left hand on your left thigh for stability.
  4. Starting with an overhand position, begin pulling your arm in towards your side.
  5. As you're pulling the weight, twist at the wrist to form a neutral grip (palms facing in).
  6. Pull your arm in as far a possible and squeeze through the shoulder blades.
  7. Slowly lower the weight back down, twisting at the wrist back to the overhand position.
  8. Repeat on the opposite arm.
lat_pull-down.jpg
Lat Pulldown:
  1. Sit down on a pull-down machine with a wide bar attached to the top pulley. Make sure that you adjust the knee pad of the machine to fit your height. These pads will prevent your body from being raised by the resistance attached to the bar.
2.Grab the bar with the palms facing forward using the prescribed grip. Note on grips: For a wide grip, your hands need to be spaced out at a distance wider than shoulder width. For a medium grip, your hands need to be spaced out at a distance equal to your shoulder width and for a close grip at a distance smaller than your shoulder width.
  1. As you have both arms extended in front of you holding the bar at the chosen grip width, bring your torso back around 30 degrees or so while creating a curvature on your lower back and sticking your chest out. This is your starting position.
  2. As you breathe out, bring the bar down until it touches your upper chest by drawing the shoulders and the upper arms down and back.Tip: Concentrate on squeezing the back muscles once you reach the full contracted position. The upper torso should remain stationary and only the arms should move. The forearms should do no other work except for holding the bar; therefore do not try to pull down the bar using the forearms.no-crunch-01_0.jpg

Dumbbell Romanian Deadlift:
  1. Put a pair of dumbbells on the ground in front of you horizontally and grasp the dumbbells with an overhand, shoulder width grip. You should be standing with a shoulder width or slightly narrower stance.
  2. Bend your knees slightly, keeping your hips and back straight and lift the weight straight up concentrating on using your hips as you stand.
  3. When standing, the weights should be resting against your thighs. This is the starting position.
  4. Lower the dumbbells by pushing your hips back and maintaining a slight bend in the knees unlike when squatting or performing regular deadlifts. You will lower the dumbbells to a position just below your knees rather than all the way to the floor. Your back should be straight and nearly parallel to the floor at the lowest position.
  5. Return to the standing position by maintaining a slight bend in your knees and keeping your hips and back straight as you lift the weight straight up. Concentrate on using your hips and legs as you stand.
  6. Repeat for the recommended amount of repetitions.

31.-bentover-reverse-flye-30-best-shoulder-exercises-of-all-time-shoulders.jpg
Standing Reverse Dumbbell Fly:
  1. Grasp dumbbells, place feet shoulder width apart, flex knees and hips to lean forward. Keep back straight. Hold dumbbells below chest and keep arms slightly flexed.
2. Raise arms to sides until elbows are slightly higher than shoulders. Keep upper arms perpendicular to body and elbows pointing up. Return and repeat. 1312-strong-wo-a-02.jpg
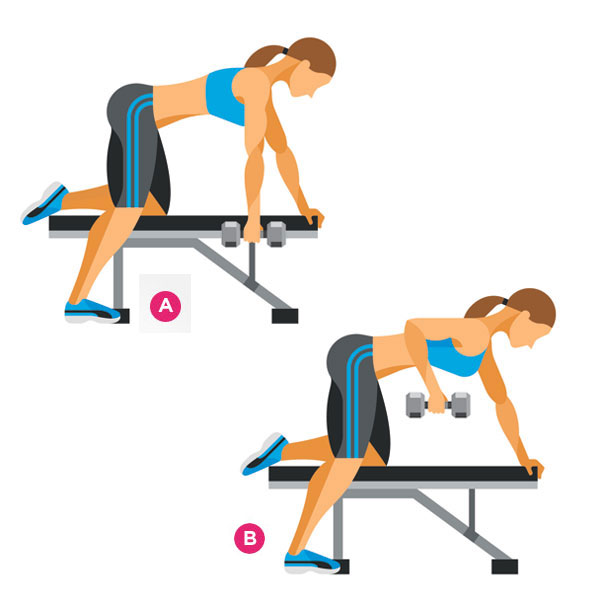
One Arm Row Off Bench:
  1. Choose a flat bench and place a dumbbell on each side of it.
  2. Place the right leg on top of the end of the bench, bend your torso forward from the waist until your upper body is parallel to the floor, and place your right hand on the other end of the bench for support.
  3. Use the left hand to pick up the dumbbell on the floor and hold the weight while keeping your lower back straight. The palm of the hand should be facing your torso. This will be your starting position.
  4. Pull the resistance straight up to the side of your chest, keeping your upper arm close to your side and keeping the torso stationary. Breathe out as you perform this step. Tip: Concentrate on squeezing the back muscles once you reach the full contracted position. Also, make sure that the force is performed with the back muscles and not the arms. Finally, the upper torso should remain stationary and only the arms should move. The forearms should do no other work except for holding the dumbbell; therefore do not try to pull the dumbbell up using the forearms.
  5. Lower the resistance straight down to the starting position. Breathe in as you perform this step.
  6. Repeat the movement for the specified amount of repetitions.
  7. Switch sides and repeat again with the other arm.


January 3, 2017

Tuesday - Leg Day!

Here is Tuesday workout for you! Leg day is one of my favorite workout days! download.jpg

Good Mornings
  1. Begin with a bar on a rack at shoulder height. Rack the bar across the rear of your shoulders as you would a power squat, not on top of your shoulders. Keep your back tight, shoulder blades pinched together, and your knees slightly bent. Step back from the rack.
  2. Begin by bending at the hips, moving them back as you bend over to near parallel. Keep your back arched and your cervical spine in proper alignment.
  3. Reverse the motion by extending through the hips with your glutes and hamstrings. Continue until you have returned to the starting position.

glutes7.jpg
Reverse Leg Raises (Off Bench)
1.Lift your legs until the thighs are in line with the torso. Hold this position then reverse the movement back to the starting position. It is important that you squeeze the glutes throughout the movement. You can also use a Swiss ball if there are no benches available, or to simply vary this exercise as the ball will be less stable.


Single-Leg-Cable.jpg
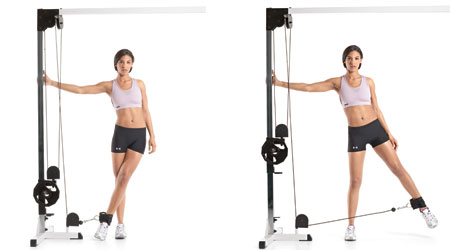
Side Cable Leg Raises
1.Lift your legs until the thighs are in line with the torso. Hold this position then reverse the movement back to the starting position. It is important that you squeeze the glutes throughout the movement. You can also use a Swiss ball if there are no benches available, or to simply vary this exercise as the ball will be less stable.


15-minute-workout-1.jpg
Cable Squats
1. Stand with feet shoulder width or slightly wider on platform between very low and close pulley cables. Squat down with knees slightly beyond foot, hips bent back behind, back straight, knees pointed same direction as feet, and shoulder above feet. Grasp stirrups to each side with arms straight.  2.Keeping chest high and back straight, raise stirrups by extending knees and hips until legs are straight. Squat down by bending hips back while allowing knees to bend forward, keeping back straight and knees pointed same direction as feet. Squat down until thighs are just past parallel to floor. Return and repeat. 3ffae76828e5b806d75722bae908d1a1.jpg

Cable Leg Kickback

  1. Hook a leather ankle cuff to a low cable pulley and then attach the cuff to your ankle.
  2. Face the weight stack from a distance of about two feet, grasping the steel frame for support.
  3. While keeping your knees and hips bent slightly and your abs tight, contract your glutes to slowly "kick" the working leg back in a semicircular arc as high as it will comfortably go as you breathe out.Tip: At full extension, squeeze your glutes for a second in order to achieve a peak contraction.
  4. Now slowly bring your working leg forward, resisting the pull of the cable until you reach the starting position.
  5. Repeat for the recommended amount of repetitions.
  6. Switch legs and repeat the movement for the other side.


Thigh_Adductor_Inner_Thigh_Machine2.png
Thigh Abductor
  1. To begin, sit down on the abductor machine and select a weight you are comfortable with. When your legs are positioned properly, grip the handles on each side. Your entire upper body (from the waist up) should be stationary. This is the starting position.
  2. Slowly press against the machine with your legs to move them away from each other while exhaling.
  3. Feel the contraction for a second and begin to move your legs back to the starting position while breathing in. Note: Remember to keep your upper body stationary to prevent any injuries from occurring.
  4. Repeat for the recommended amount of repetitions.

Side-Lunge_Exercise.jpg
Side Lunge
  1. Assume an athletic standing position, with the knees and hips slightly bent, feet shoulder-width apart, and the head and chest up. This will be your starting position.
  2. Staying low, take a slow, lateral step to the right. Keep your toes pointed forward and stay low. Extend the left knee, driving your weight to the right, flexing the knee and hip into a side lunge. Maintain good posture through the entire spine, keeping your head and chest up.
  3. Pause at the bottom of the motion, and then extend through the working leg to return to a standing position, transitioning into a lunge to the opposite side.

**I do not own any of these images. Provided via google.com

January 2, 2017

Monday - Chest Day!

Here is a quick and easy chest day workout for you to try! 
Barbell Bench Press :
    1. Lie back on a flat bench. ...
    2. From the starting position, breathe in and begin coming down slowly until the bar touches your middle chest.
    3. After a brief pause, push the bar back to the starting position as you breathe out. ...
    4. Repeat the movement for the prescribed amount of repetitions.olympic-arms-3.jpg
Incline Push-Up Guide. Stand facing bench or sturdy elevated platform. Place hands on edge of bench or platform, slightly wider than shoulder width. Position forefoot back from bench or platform with arms and body straight.


flat-bench-dumbbell-flyes.jpg
Dumbbell Flyes
  1. Lie down on a flat bench with a dumbbell on each hand resting on top of your thighs. The palms of your hand will be facing each other.
  2. Then using your thighs to help raise the dumbbells, lift the dumbbells one at a time so you can hold them in front of you at shoulder width with the palms of your hands facing each other. Raise the dumbbells up like you're pressing them, but stop and hold just before you lock out. This will be your starting position.
  3. With a slight bend on your elbows in order to prevent stress at the biceps tendon, lower your arms out at both sides in a wide arc until you feel a stretch on your chest. Breathe in as you perform this portion of the movement. Tip: Keep in mind that throughout the movement, the arms should remain stationary; the movement should only occur at the shoulder joint.
  4. Return your arms back to the starting position as you squeeze your chest muscles and breathe out. Tip: Make sure to use the same arc of motion used to lower the weights.


around the word.png
Around the World:
  1. Lay down on a flat bench holding a dumbbell in each hand with the palms of the hands facing towards the ceiling. Tip: Your arms should be parallel to the floor and next to your thighs. To avoid injury, make sure that you keep your elbows slightly bent. This will be your starting position.
  2. Now move the dumbbells by creating a semi-circle as you displace them from the initial position to over the head. All of the movement should happen with the arms parallel to the floor at all times. Breathe in as you perform this portion of the movement.
  3. Reverse the movement to return the weight to the starting position as you exhale.


machine-incline-press.jpg
Machine Incline Press:
  1. Load an appropriate weight onto the pins and adjust the seat for your height. The handles should be near the top of the pectorals at the beginning of the motion. Your chest and head should be up and your shoulder blades retracted. This will be your starting position.
  2. Press the handles forward by extending through the elbow.
  3. After a brief pause at the top, return the weight just above the start position, keeping tension on the muscles by not returning the weight to the stops until the set is complete.
Seated-Chest-Press-Machine.gif

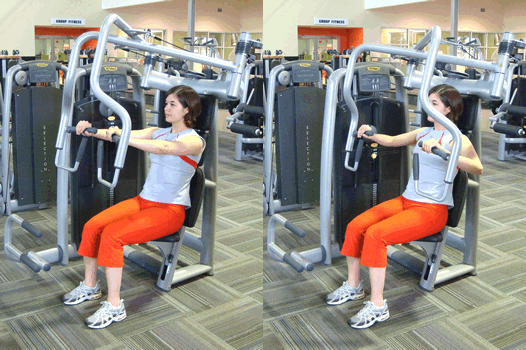
Seated Chest Press:
1. Follow machine instructions for setup and select desired weight. Sit so feet are flat on floor, knees are above ankles, back is straight and supported on pad. Grip the handles near your chest, palms facing downward. Engage abs and keep spine straight.
2.Action EXHALE: Push the handles forward by straightening at the elbows.
INHALE: Slowly bend the elbows to return to the start position, with hands near the chest, to complete one rep.